To the casual observer, not much has changed inside my house since my last post one month ago. I have not turned down any opportunities for fun and somehow the projects are incapable of finishing themselves on their own. No biggie. While no one project is fully complete, a lot is happening. The window mouldings and new drapery are complete in the living areas. These improvements made a big difference in the look and feel of the house. Window trim and drapery in the three bedrooms are on hold for now—it makes more sense for me to paint bedrooms 2 and 3 first so I don’t have to carefully mask around freshly painted trim and I (most likely someone else) can coordinate drapery with room colors.
The newly installed window trim and fresh satin paint made the baseboards look unfinished, so I began the process of painting all of the baseboards in the house. I replaced some of the existing door trim as there were two areas of the house where the trim was dented down low, most likely from the child of the previous owners. Since I was already fixing everything else it made sense to fill the dents in the sheetrock and retexture the walls in the damaged areas. The portion of the walls below the belt trim is complete with the exception of paint and I am planning a color change there.
Above the belt trim I filled nail holes, did some light retexturing and Hanna graciously volunteered to do the painting. The previous owners left behind the paints they used, so not only do I have the existing paint, I also have the color codes so I can have additional cans mixed. The trim is all painted with the exception of the main bathroom and hallway to the bedrooms.
The electrical work is moving forward, however the project goal involved kitchen and living room lighting, none of which has been touched yet. I have an electrical contractor friend helping me and he often gets stuck working long hours. While waiting for my contractor friend to become available I decided to start on my own in other areas of the house, using the knowledge I gained from helping him install recessed lighting and new electrical outlets in his ‘man cave.’
The two bathrooms had existing 6” recessed lights, however twelve years ago when my home was constructed, fluorescent fixtures still utilized magnetic ballasts with a separate starter to get the bulb going. When you flick the switch there was a two second delay before anything happened, then another couple of seconds of flickering before you actually got light. (See first picture.) Newer designs are much quicker and use electronic ballasts. Regardless, I hate fluorescent light and it’s not dimmable, so I went LED.
Here's what I removed...under the cone and trim ring, a magnetic-ballasted fixture:

The 6” cans in the bathrooms were designed for fluorescent and not IC-rated to contact insulation in the attic, so I swapped the cans out for the nice Title-24 energy efficient cans that are air-tight to reduce heating losses through the can and rated for insulation contact so my existing attic insulation can keep doing its job. I had to venture into the attic, disconnect the wiring and remove the brackets that brace the old recessed can between studs. This leaves you with a hole in the ceiling. The new recessed cans I installed are called remodel cans and are designed to be installed after the home has already been built and sheetrock is installed. Using the existing wiring, I made the connections to the housing and pushed the recessed can into the hole, with the unit supported by four clips that hold the can in place against the sheetrock. To keep it sealed I caulked the interface between the sheetrock and the can and installed the LED module. The two bathrooms now have instant-on light and a very pleasing amount and color of light. Unlike an incandescent recessed can light, there is no ugly and heat and air conditioning-wasting gap between the trim and the bulb, it’s all one piece.
Here is the new light engine. Obviously all you see is the flush-mounted white trim ring and recessed light.
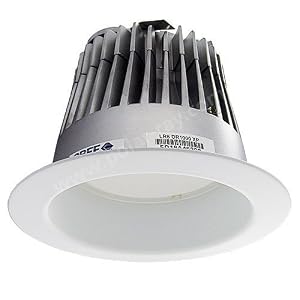
While I was at it I replaced the light fixtures in the hallway. They were standard non-recessed hallway lights. I removed those fixtures, cut 6” holes in the sheetrock to accommodate the recessed can and wired them up. The hallway is now on a 3-way dimmer so you can turn the lights on and off from either end and they can be dimmed. It’s great being able to crank them up for cleaning and dim them down for ambiance. The dimmer switches illuminate when the lights are off so you can find the switch at night; brilliant. I had originally installed compact fluorescents (CFL) in those fixtures however I swapped back to incandescent because I hated the light from CFLs. The new LED fixtures are 10 watts each, so I went from 120 watts (two 60W bulbs) down to just 20 watts. And that’s at full brightness, I seem to like the look at 30%, so I think all of the hallway lighting is pulling around 6 watts.
Here the 'business end" of the new IC-rated, air-tight hallway lights, from the attic, obviously:

When my electrician friend is available we will complete the project we set-out for, converting the kitchen lights from six fluorescent tubes to LED can lights. There will be six of those. We are adding two more can lights to the living room. By the time we’re done my house will be full-LED except for the porch lights and bedrooms where I prefer non-overhead lighting.
No other big projects planned; I have plenty of existing projects to keep me busy for a while.


